Preparation of Golden image (vDisk) for Citrix Provisioning Server
Since you now create one base image, and after creating the vDisk you start to make it “private” or as you want to publish it.That will speed up the process of creating new Vdisk’s for new users
Step-1 Create a Golden Image
A golden image is the image that is going to be streamed to the various VMs that the end users connect to.
1. Install the host operating system to the virtual machine (VM).
2. Add all the various applications that required by the end-user.
3. Do not install the VDA Agent.
4. Once the image is created with VMTools and installed minus the VDA agent, install the Provisioning Server Target Device Software. Once installed, shut down the VM and proceed to Creating the vDisk File. Step-2 Creating the vDisk File in the Console To create a new vDisk file in the Console. 2. If you accessed this dialog from the site’s vDisk pool, in the drop-down menu, select the store where this vDisk should reside. If you accessed this dialog from the store, from the drop-down menu, select the site where this vDisk should be added.
3. In the Server used to create the vDisk drop-down menu, select the Provisioning Server to create the vDisk.
4. Type a filename for the vDisk. Optionally, type a description for this new vDisk in the description textbox.
5. In the Size text box, scroll to select the appropriate size to allocate for this vDisk file.
2. If you accessed this dialog from the site’s vDisk pool, in the drop-down menu, select the store where this vDisk should reside. If you accessed this dialog from the store, from the drop-down menu, select the site where this vDisk should be added.
3. In the Server used to create the vDisk drop-down menu, select the Provisioning Server to create the vDisk.
4. Type a filename for the vDisk. Optionally, type a description for this new vDisk in the description textbox.
5. In the Size text box, scroll to select the appropriate size to allocate for this vDisk file.
 6. In the VHD Format text box, select the format as either Fixed or Dynamic .( Set the size for the vDisk. Normally I have enough of 30 to 50 gb, depending on the installed applications on the server. Set VHD type to Dynamic which means that only the space that is really needed will be used for storing the vDisk)
7. Click Create vDisk, a progress dialog opens. Depending on the disk size and other factors, it might take several minutes to create the vDisk. After the vDisk is successfully created, it displays in the Console’s details pane and is ready for formatting.
8. Right-click on the vDisk in the Console, then select Mount vDisk. The vDisk icon appears with an orange arrow, if mounted properly.
Step-3 Formatting a vDisk
For a target device to access the new vDisk, after you have created and allocated space for the vDisk file on the Provisioning Server, you must format the vDisk.
To format a mounted vDisk from the Console
In the Console, the vDisk should appear as a removable disk to the operating system.
1. Open a Windows Explorer window (click My Computer on the Desktop or on the Start Menu).
2. Right-click on the vDisk, then select Format.
3. Create a descriptive name for the volume label for the vDisk.
4. Click Start. Then click OK on the warning message that appears.
5. After formatting, close Windows Explorer and unmount the vDisk.
To unmount a vDisk
To unmount a vDisk and make it available to target devices, in the Console, right-click on the vDisk, and then select the Unmount vDisk option.
Step 4 – Create Target Device within PVS for the “Master Server”
1. Within the Provisioning Services Console, under Device Collections, create a Device Collection with the name Masters (or anything you like). This is not a required step but is recommended because it is easier to manage later.
6. In the VHD Format text box, select the format as either Fixed or Dynamic .( Set the size for the vDisk. Normally I have enough of 30 to 50 gb, depending on the installed applications on the server. Set VHD type to Dynamic which means that only the space that is really needed will be used for storing the vDisk)
7. Click Create vDisk, a progress dialog opens. Depending on the disk size and other factors, it might take several minutes to create the vDisk. After the vDisk is successfully created, it displays in the Console’s details pane and is ready for formatting.
8. Right-click on the vDisk in the Console, then select Mount vDisk. The vDisk icon appears with an orange arrow, if mounted properly.
Step-3 Formatting a vDisk
For a target device to access the new vDisk, after you have created and allocated space for the vDisk file on the Provisioning Server, you must format the vDisk.
To format a mounted vDisk from the Console
In the Console, the vDisk should appear as a removable disk to the operating system.
1. Open a Windows Explorer window (click My Computer on the Desktop or on the Start Menu).
2. Right-click on the vDisk, then select Format.
3. Create a descriptive name for the volume label for the vDisk.
4. Click Start. Then click OK on the warning message that appears.
5. After formatting, close Windows Explorer and unmount the vDisk.
To unmount a vDisk
To unmount a vDisk and make it available to target devices, in the Console, right-click on the vDisk, and then select the Unmount vDisk option.
Step 4 – Create Target Device within PVS for the “Master Server”
1. Within the Provisioning Services Console, under Device Collections, create a Device Collection with the name Masters (or anything you like). This is not a required step but is recommended because it is easier to manage later.
 2.Right click the “Masters” Device Collection and click on Create Device.
 3.On the General tab, enter the name of the Master server. Select to Boot from Hard Desk and fill in the MAC address of the primary NIC of the Master Server (the NIC the Master server boots from).
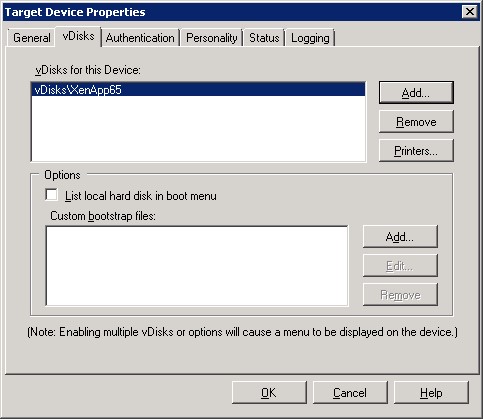
4.On the vDisk tab, Add the vDisk created in step 2 and click OK
3.On the General tab, enter the name of the Master server. Select to Boot from Hard Desk and fill in the MAC address of the primary NIC of the Master Server (the NIC the Master server boots from).
4.On the vDisk tab, Add the vDisk created in step 2 and click OK
 Installation of Provisioning Server Target Device Software and VDA on Golden Image
1. Go to Vsphere and start the base machine and make the required changes in the machine and then install the Provisioning Services using Provisioning Services installation media and select Install Target Device for 64 bit Platform
Installation of Provisioning Server Target Device Software and VDA on Golden Image
1. Go to Vsphere and start the base machine and make the required changes in the machine and then install the Provisioning Services using Provisioning Services installation media and select Install Target Device for 64 bit Platform
 2. Click Install
 3. Finish
 4. Select Yes to restart the Master Image
 5. Start the Provisioning Services Imaging Wizard
 6. Click Next
 7. Enter the server name of the Provisioning Services server where you stored the vDisk and click Next
 8. Select Use existing vDisk and select the vDisk created in step 2
 (When receiving the error “There are no vDisks available that are in Private mode and not locked accessible by the Server specified” make sure there is no Lock on the vDisk, you can remove the Lock in the PVS console by right-click the vDisk and click on the option “Manage Locks”)
9. click Next
10.Click Autofit and then Next
The errors in this dialog means that the target vDisk is smaller than the local hard disk in the Master Server. If you get this errors you have to click on Autofit.
11. Click Next
12. Click Next
13. Select Finish
14. Click on Optimize for Provisioning Services
What to optimize depends on your environment, for example in most cases the Windows Auto-update services can be disabled (also recommended sins the vDisk is read-only). But if System Center 2012 Endpoint Protection is used in the environment, the Windows Auto-update services is needed for the anti-virus updates. Apply what is applicable for your environment and click OK.
15. Click Finish
16. Click Yes to reboot the server.
17. After the reboot, log on with the same user account. Vmware Esx will automatically start to convert the files from the local hard drive to the vDisk.
18. Click on Finish
Step 5 – Configure the Master Server to boot from vDisk
1. Within the Provisioning Services Console open the properties of the Master Server.
2. On the General tab and change “Boot from” to vDisk. Click OK
Step 8 – Deploying the vDisk
Within the Provisioning Services console, open the properties of the vDisk.
Change “Access mode” to Standard Image (multi-device, read-only access) and select the place where you want to store the cache files. Enable Active Directory machine account password management.
If you have more Citrix Provisioning Services servers in your environment, right-click the vDisk and click on Load Balancing
Select Use the load balancing algorithm and Rebalance Enabled. Click OK
Open Windows Explorer and copy the vDisk to the other servers
(When receiving the error “There are no vDisks available that are in Private mode and not locked accessible by the Server specified” make sure there is no Lock on the vDisk, you can remove the Lock in the PVS console by right-click the vDisk and click on the option “Manage Locks”)
9. click Next
10.Click Autofit and then Next
The errors in this dialog means that the target vDisk is smaller than the local hard disk in the Master Server. If you get this errors you have to click on Autofit.
11. Click Next
12. Click Next
13. Select Finish
14. Click on Optimize for Provisioning Services
What to optimize depends on your environment, for example in most cases the Windows Auto-update services can be disabled (also recommended sins the vDisk is read-only). But if System Center 2012 Endpoint Protection is used in the environment, the Windows Auto-update services is needed for the anti-virus updates. Apply what is applicable for your environment and click OK.
15. Click Finish
16. Click Yes to reboot the server.
17. After the reboot, log on with the same user account. Vmware Esx will automatically start to convert the files from the local hard drive to the vDisk.
18. Click on Finish
Step 5 – Configure the Master Server to boot from vDisk
1. Within the Provisioning Services Console open the properties of the Master Server.
2. On the General tab and change “Boot from” to vDisk. Click OK
Step 8 – Deploying the vDisk
Within the Provisioning Services console, open the properties of the vDisk.
Change “Access mode” to Standard Image (multi-device, read-only access) and select the place where you want to store the cache files. Enable Active Directory machine account password management.
If you have more Citrix Provisioning Services servers in your environment, right-click the vDisk and click on Load Balancing
Select Use the load balancing algorithm and Rebalance Enabled. Click OK
Open Windows Explorer and copy the vDisk to the other servers
2. Add all the various applications that required by the end-user.
3. Do not install the VDA Agent.
4. Once the image is created with VMTools and installed minus the VDA agent, install the Provisioning Server Target Device Software. Once installed, shut down the VM and proceed to Creating the vDisk File. Step-2 Creating the vDisk File in the Console To create a new vDisk file in the Console.
- In the Console tree, right-click on the vDisk Pool in the site where you want to add those vDisks, then select the Create vDisk menu option. The Create vDisk dialog appears.
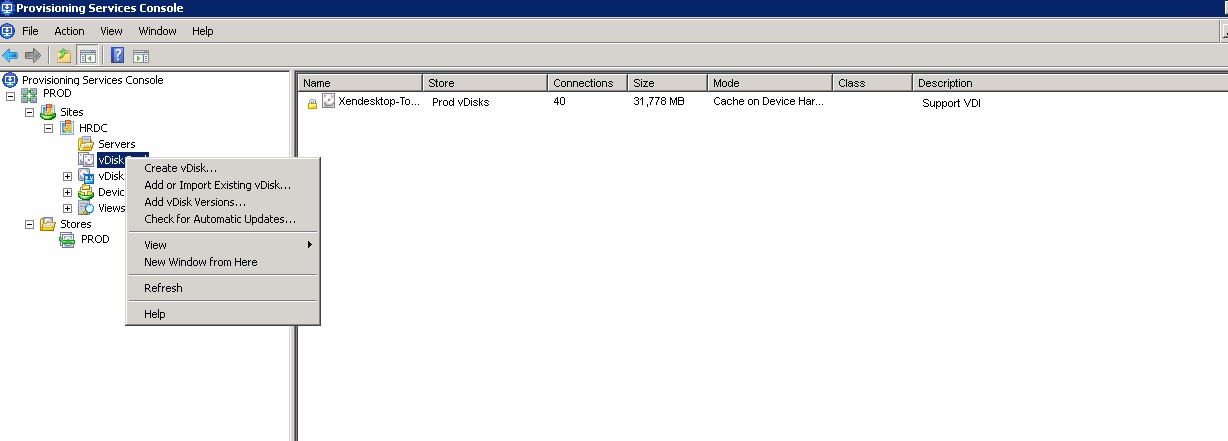 2. If you accessed this dialog from the site’s vDisk pool, in the drop-down menu, select the store where this vDisk should reside. If you accessed this dialog from the store, from the drop-down menu, select the site where this vDisk should be added.
3. In the Server used to create the vDisk drop-down menu, select the Provisioning Server to create the vDisk.
4. Type a filename for the vDisk. Optionally, type a description for this new vDisk in the description textbox.
5. In the Size text box, scroll to select the appropriate size to allocate for this vDisk file.
2. If you accessed this dialog from the site’s vDisk pool, in the drop-down menu, select the store where this vDisk should reside. If you accessed this dialog from the store, from the drop-down menu, select the site where this vDisk should be added.
3. In the Server used to create the vDisk drop-down menu, select the Provisioning Server to create the vDisk.
4. Type a filename for the vDisk. Optionally, type a description for this new vDisk in the description textbox.
5. In the Size text box, scroll to select the appropriate size to allocate for this vDisk file.
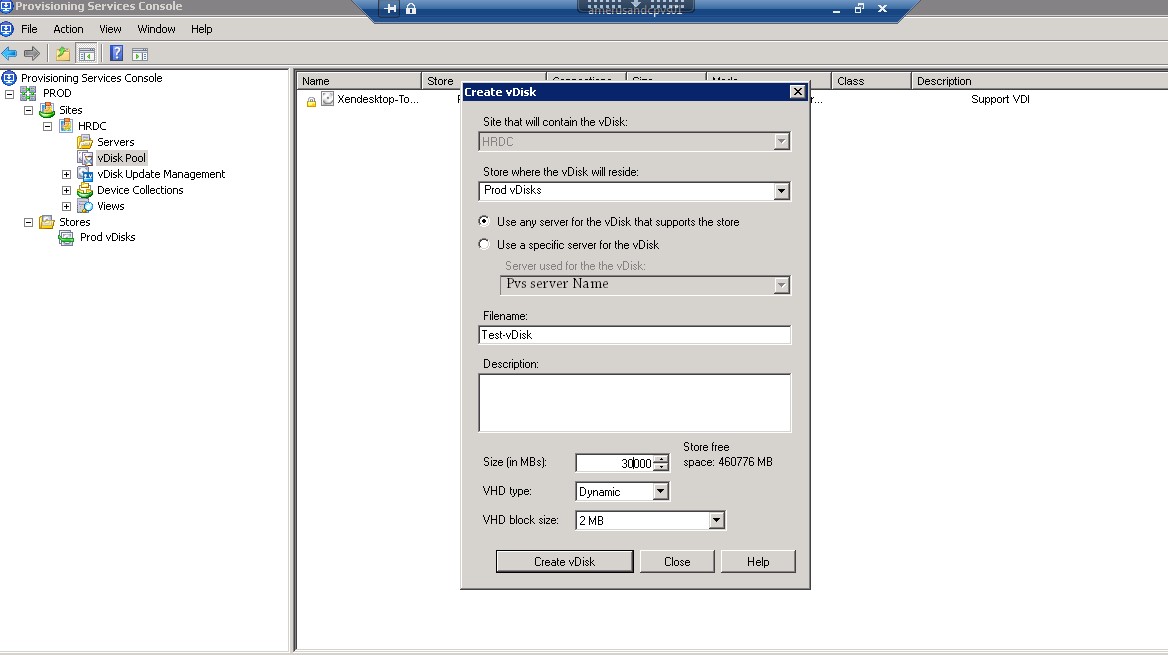 6. In the VHD Format text box, select the format as either Fixed or Dynamic .( Set the size for the vDisk. Normally I have enough of 30 to 50 gb, depending on the installed applications on the server. Set VHD type to Dynamic which means that only the space that is really needed will be used for storing the vDisk)
7. Click Create vDisk, a progress dialog opens. Depending on the disk size and other factors, it might take several minutes to create the vDisk. After the vDisk is successfully created, it displays in the Console’s details pane and is ready for formatting.
8. Right-click on the vDisk in the Console, then select Mount vDisk. The vDisk icon appears with an orange arrow, if mounted properly.
Step-3 Formatting a vDisk
For a target device to access the new vDisk, after you have created and allocated space for the vDisk file on the Provisioning Server, you must format the vDisk.
To format a mounted vDisk from the Console
In the Console, the vDisk should appear as a removable disk to the operating system.
1. Open a Windows Explorer window (click My Computer on the Desktop or on the Start Menu).
2. Right-click on the vDisk, then select Format.
3. Create a descriptive name for the volume label for the vDisk.
4. Click Start. Then click OK on the warning message that appears.
5. After formatting, close Windows Explorer and unmount the vDisk.
To unmount a vDisk
To unmount a vDisk and make it available to target devices, in the Console, right-click on the vDisk, and then select the Unmount vDisk option.
Step 4 – Create Target Device within PVS for the “Master Server”
1. Within the Provisioning Services Console, under Device Collections, create a Device Collection with the name Masters (or anything you like). This is not a required step but is recommended because it is easier to manage later.
6. In the VHD Format text box, select the format as either Fixed or Dynamic .( Set the size for the vDisk. Normally I have enough of 30 to 50 gb, depending on the installed applications on the server. Set VHD type to Dynamic which means that only the space that is really needed will be used for storing the vDisk)
7. Click Create vDisk, a progress dialog opens. Depending on the disk size and other factors, it might take several minutes to create the vDisk. After the vDisk is successfully created, it displays in the Console’s details pane and is ready for formatting.
8. Right-click on the vDisk in the Console, then select Mount vDisk. The vDisk icon appears with an orange arrow, if mounted properly.
Step-3 Formatting a vDisk
For a target device to access the new vDisk, after you have created and allocated space for the vDisk file on the Provisioning Server, you must format the vDisk.
To format a mounted vDisk from the Console
In the Console, the vDisk should appear as a removable disk to the operating system.
1. Open a Windows Explorer window (click My Computer on the Desktop or on the Start Menu).
2. Right-click on the vDisk, then select Format.
3. Create a descriptive name for the volume label for the vDisk.
4. Click Start. Then click OK on the warning message that appears.
5. After formatting, close Windows Explorer and unmount the vDisk.
To unmount a vDisk
To unmount a vDisk and make it available to target devices, in the Console, right-click on the vDisk, and then select the Unmount vDisk option.
Step 4 – Create Target Device within PVS for the “Master Server”
1. Within the Provisioning Services Console, under Device Collections, create a Device Collection with the name Masters (or anything you like). This is not a required step but is recommended because it is easier to manage later.
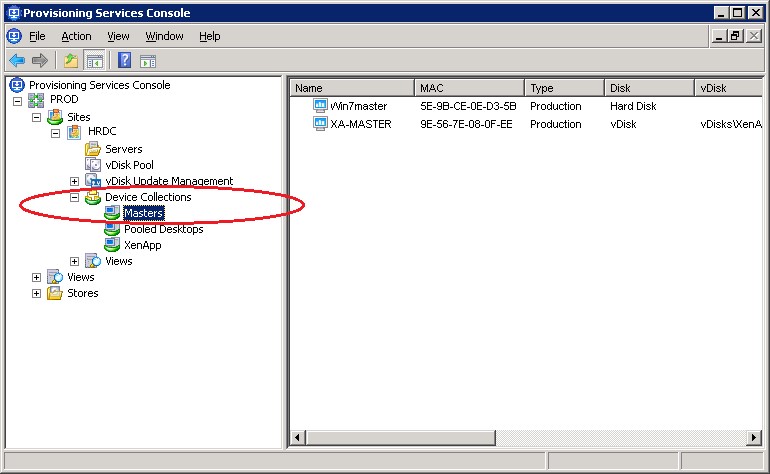 2.Right click the “Masters” Device Collection and click on Create Device.
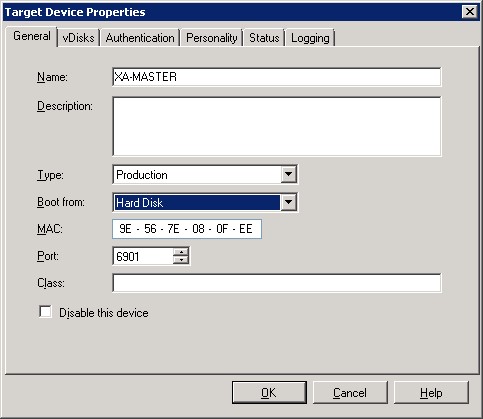 3.On the General tab, enter the name of the Master server. Select to Boot from Hard Desk and fill in the MAC address of the primary NIC of the Master Server (the NIC the Master server boots from).
4.On the vDisk tab, Add the vDisk created in step 2 and click OK
3.On the General tab, enter the name of the Master server. Select to Boot from Hard Desk and fill in the MAC address of the primary NIC of the Master Server (the NIC the Master server boots from).
4.On the vDisk tab, Add the vDisk created in step 2 and click OK
 Installation of Provisioning Server Target Device Software and VDA on Golden Image
1. Go to Vsphere and start the base machine and make the required changes in the machine and then install the Provisioning Services using Provisioning Services installation media and select Install Target Device for 64 bit Platform
Installation of Provisioning Server Target Device Software and VDA on Golden Image
1. Go to Vsphere and start the base machine and make the required changes in the machine and then install the Provisioning Services using Provisioning Services installation media and select Install Target Device for 64 bit Platform
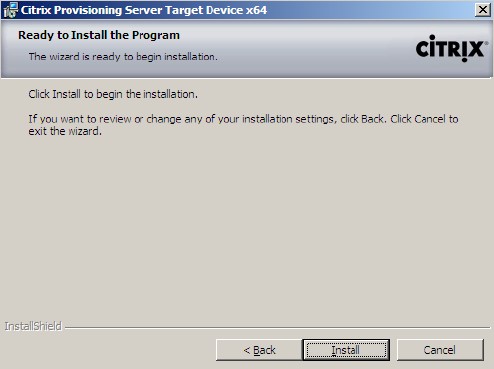
 2. Click Install
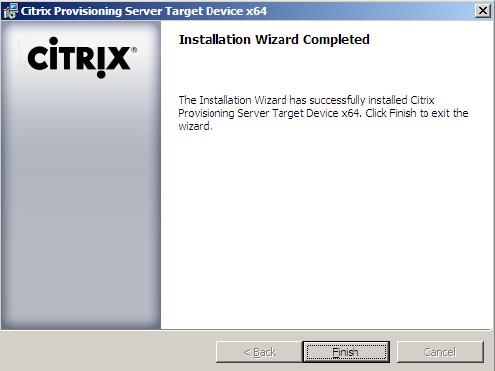
 3. Finish
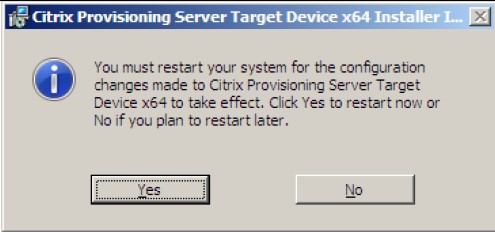
 4. Select Yes to restart the Master Image
 5. Start the Provisioning Services Imaging Wizard
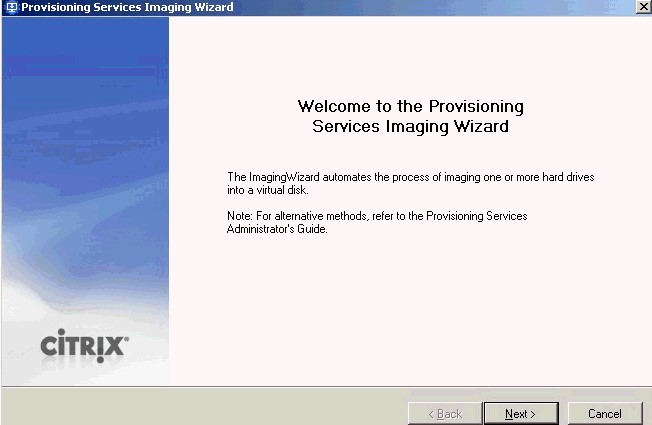 6. Click Next
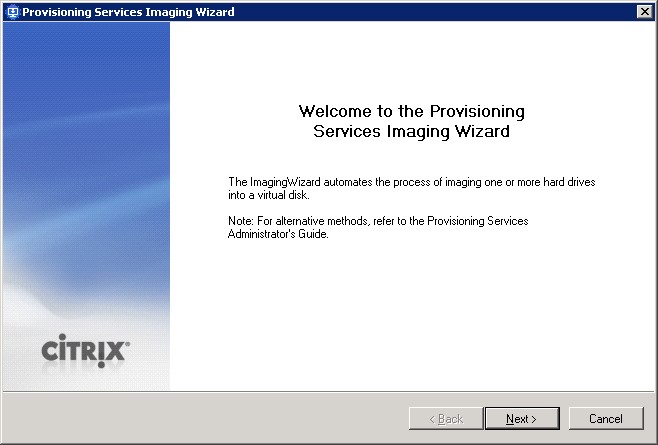 7. Enter the server name of the Provisioning Services server where you stored the vDisk and click Next
 8. Select Use existing vDisk and select the vDisk created in step 2
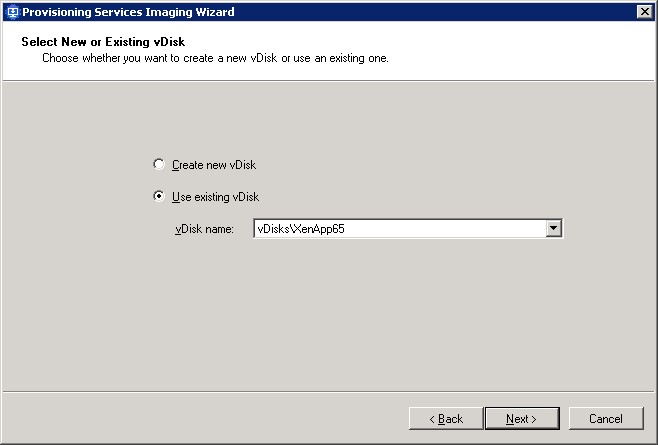 (When receiving the error “There are no vDisks available that are in Private mode and not locked accessible by the Server specified” make sure there is no Lock on the vDisk, you can remove the Lock in the PVS console by right-click the vDisk and click on the option “Manage Locks”)
9. click Next
10.Click Autofit and then Next
The errors in this dialog means that the target vDisk is smaller than the local hard disk in the Master Server. If you get this errors you have to click on Autofit.
11. Click Next
12. Click Next
13. Select Finish
14. Click on Optimize for Provisioning Services
What to optimize depends on your environment, for example in most cases the Windows Auto-update services can be disabled (also recommended sins the vDisk is read-only). But if System Center 2012 Endpoint Protection is used in the environment, the Windows Auto-update services is needed for the anti-virus updates. Apply what is applicable for your environment and click OK.
15. Click Finish
16. Click Yes to reboot the server.
17. After the reboot, log on with the same user account. Vmware Esx will automatically start to convert the files from the local hard drive to the vDisk.
18. Click on Finish
Step 5 – Configure the Master Server to boot from vDisk
1. Within the Provisioning Services Console open the properties of the Master Server.
2. On the General tab and change “Boot from” to vDisk. Click OK
Step 8 – Deploying the vDisk
Within the Provisioning Services console, open the properties of the vDisk.
Change “Access mode” to Standard Image (multi-device, read-only access) and select the place where you want to store the cache files. Enable Active Directory machine account password management.
If you have more Citrix Provisioning Services servers in your environment, right-click the vDisk and click on Load Balancing
Select Use the load balancing algorithm and Rebalance Enabled. Click OK
Open Windows Explorer and copy the vDisk to the other servers
(When receiving the error “There are no vDisks available that are in Private mode and not locked accessible by the Server specified” make sure there is no Lock on the vDisk, you can remove the Lock in the PVS console by right-click the vDisk and click on the option “Manage Locks”)
9. click Next
10.Click Autofit and then Next
The errors in this dialog means that the target vDisk is smaller than the local hard disk in the Master Server. If you get this errors you have to click on Autofit.
11. Click Next
12. Click Next
13. Select Finish
14. Click on Optimize for Provisioning Services
What to optimize depends on your environment, for example in most cases the Windows Auto-update services can be disabled (also recommended sins the vDisk is read-only). But if System Center 2012 Endpoint Protection is used in the environment, the Windows Auto-update services is needed for the anti-virus updates. Apply what is applicable for your environment and click OK.
15. Click Finish
16. Click Yes to reboot the server.
17. After the reboot, log on with the same user account. Vmware Esx will automatically start to convert the files from the local hard drive to the vDisk.
18. Click on Finish
Step 5 – Configure the Master Server to boot from vDisk
1. Within the Provisioning Services Console open the properties of the Master Server.
2. On the General tab and change “Boot from” to vDisk. Click OK
Step 8 – Deploying the vDisk
Within the Provisioning Services console, open the properties of the vDisk.
Change “Access mode” to Standard Image (multi-device, read-only access) and select the place where you want to store the cache files. Enable Active Directory machine account password management.
If you have more Citrix Provisioning Services servers in your environment, right-click the vDisk and click on Load Balancing
Select Use the load balancing algorithm and Rebalance Enabled. Click OK
Open Windows Explorer and copy the vDisk to the other servers
